Table of Contents
- Introduction
- K2Node and what are they?
- Make a custom K2Node
- Populate the node with pins
- Adding the node’s logic
- Improving the UX
- Final touches
- Wrapping up for now
Introduction
Note: If you want to expose functions from C++ to Blueprint, this post is way too overkill. You should check out this resource instead.
During the development of my custom quest editor, Adventure, I’ve gotten very comfortable with creating custom nodes for both Blueprint and custom graphs. Since there is not much on the topic, I figured I could share my knowledge with the community.
This blog post will only cover custom Blueprint nodes since a custom graph node is a different story.
K2Node and what are they?
Kismet was the first visual scripting language in the engine. It was first introduced with Unreal Engine 3, then Kismet 2 came along and turned into Blueprint, which is what we have today. So that is why you’ll see K2 (Kismet 2) in some places of the engine.
This naturally brings us to K2Node (Kismet 2 Node), the parent class for all nodes used for Blueprint graphs. Most of the nodes in the graph inherit from UK2Node_CallFunction.
K2Nodes are very advanced Blueprint nodes that can go beyond the specifiers of UFUNCTION / UPARAM and give the developer full control of how it behaves, but 99% of the time, the specifiers are enough.
A great example of a custom Blueprint node is all construct nodes such as Spawn Actor From Class and Construct Object From Class, which greatly reduces the spaghetti of Blueprint graphs.
Spawn Actor consists of two Blueprint nodes, BeginDeferredActorSpawnFromClass and FinishSpawningActor, and for each variable, you mark as ExposeOnSpawn, the Blueprint compiler generates another Blueprint setter node. So the execution order for a SpawnActor node is:
BeginDeferredActorSpawnFromClass ->
Generated Blueprint node setters for ExposeOnSpawn variables ->
FinishSpawningActor
You can think of K2Nodes as subgraphs that can contain multiple nodes.
I’d suggest checking out UK2Node_SpawnActorFromClass as it is relatively straight forward with plenty of comments to understand what’s happening.
Make a custom K2Node
This post assumes you are familiar with Unreal Engine and C++, so I won’t cover the class creation steps. But you need an UncookedOnly module and a class that inherits from UK2Node.
In this introduction to K2Nodes, we will make an IsValid node from scratch.
To create a K2Node, you need to override a few functions:
//Gets the name of this node, shown in title bar of the node.
virtual FText GetNodeTitle(ENodeTitleType::Type TitleType) const;

//Gets the tooltip that will be shown when the node is hovered
virtual FText GetTooltipText() const;

//Override to provide a default category for specific node types to be listed under.
virtual FText GetMenuCategory() const;

//Adds the node to the context menu
virtual void GetMenuActions(FBlueprintActionDatabaseRegistrar& ActionRegistrar) const;

//Allocate default pins for a given node
virtual void AllocateDefaultPins();

//Expands a node while compiling, which may add additional nodes or delete this node.
virtual void ExpandNode(class FKismetCompilerContext& CompilerContext, UEdGraph* SourceGraph);
Let’s start with the essential functions. Your custom K2Node class header should look like this, to begin with:
UCLASS()
class UK2Node_IsValid : public UK2Node
{
	GENERATED_BODY()

	//Start of UEdGraphNode interface implementation
	virtual FText GetNodeTitle(ENodeTitleType::Type TitleType) const override;
	virtual FText GetTooltipText() const override;
	//End of implementation

	//Start of UK2Node interface implementation
	virtual FText GetMenuCategory() const override;
	//End of implementation
};
Lets start by implementing them in .cpp:
FText UK2Node_IsValid::GetMenuCategory() const
{
	return LOCTEXT("K2Node_IsValid_Category", "Validity");
}

FText UK2Node_IsValid::GetNodeTitle(ENodeTitleType::Type TitleType) const
{
	return LOCTEXT("K2Node_IsValid_NodeTitle", "Is Valid");
}

FText UK2Node_IsValid::GetTooltipText() const
{
	return LOCTEXT("K2Node_IsValid_TooltipText", "Determines if an object is valid");
}
These functions are just cosmetics but are essential in the sense that they are important for the UX of the node.
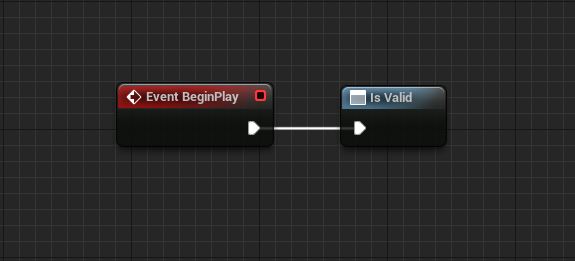
Now compile and open any Blueprint graph and search for the name you gave the GetNodeTitle function. You might realize you can’t find the node in the list because we’re missing a vital override.
Add this:
//.h
virtual void GetMenuActions(FBlueprintActionDatabaseRegistrar& ActionRegistrar) const override;

//.cpp
void UK2Node_IsValid::GetMenuActions(FBlueprintActionDatabaseRegistrar& ActionRegistrar) const
{
	Super::GetMenuActions(ActionRegistrar);
	UClass* Action = GetClass();
	if (ActionRegistrar.IsOpenForRegistration(Action))
	{
		UBlueprintNodeSpawner* Spawner = UBlueprintNodeSpawner::Create(GetClass());
		ActionRegistrar.AddBlueprintAction(Action, Spawner);
	}
}
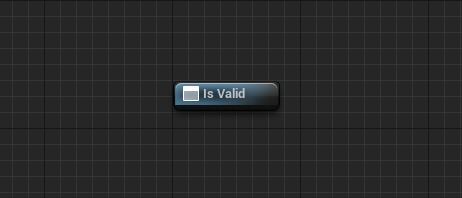
Your node is now fully set up with a title, category, and tooltip; you can find it in the node list. It should now look like this when you add it to a Blueprint graph:
Populate the node with pins
Our node is empty and can’t be interacted with other pins. To add pins, you need to override this function I mentioned earlier:
virtual void AllocateDefaultPins() override;
AllocateDefaultPins is where you declare all your pins for your nodes. Everything from a float pin to an execute pin.
Let’s add the most important pin for a Blueprint node we want to execute, the execute pin or ExecPin:
//Version 1
void UK2Node_IsValid::AllocateDefaultPins()
{
	CreatePin(EGPD_Input, UEdGraphSchema_K2::PC_Exec, UEdGraphSchema_K2::PN_Execute);
}

// Version 2
void UK2Node_IsValid::AllocateDefaultPins()
{
	CreatePin(EGPD_Input, TEXT("exec"), TEXT("execute"));
}
As you can see above, we have two versions of making an ExecPin, and both are valid in the sense that they work, but Version 1 is the better alternative.
UEdGraphSchema_K2 is a great class to get names of different pin types and should be used when choosing the pin’s PinCategory.
Now compile and see what happened with the node.
Your node now has an execute pin that is connectable. How cool! Now let’s add the rest! :D
Now we need to add the Object pin that we will use to get the object we will check for validation:
CreatePin(EGPD_Input, UEdGraphSchema_K2::PC_Object, UObject::StaticClass(), NAME_ObjectToCheck);
Now you may wonder what is NAME_ObjectToCheck I have for the pin name. That is a static variable to easily search for the pin rather than keeping track of their names.
And this is how you do it:
//.h
static const FName NAME_ObjectToCheck;

//.cpp
const FName UK2Node_IsValid::NAME_ObjectToCheck(TEXT("Object To Check"));
I recommend doing this for any pins with custom names. It makes your life much easier making custom nodes, especially when you’re using UEdGraphNode::FindPin.
You see, we now have four arguments instead of three when calling CreatePin. To declare a(n) object/struct/class pin, you must provide the class for the PinSubCategory argument.
Here are more examples of declaring pins with a PinSubCategory:
//Creates a reference pin of type Actor.
CreatePin(EGPD_Input, UEdGraphSchema_K2::PC_Object, AActor::StaticClass(), NAME_MyActorReferencePin);

//Creates a struct pin of type GameplayTag.
CreatePin(EGPD_Input, UEdGraphSchema_K2::PC_Struct, FGameplayTag::StaticStruct(), NAME_MyGameplayTagStructPin);

//Creates a class pin of type Character.
CreatePin(EGPD_Input, UEdGraphSchema_K2::PC_Class, ACharacter::StaticClass(), NAME_MyCharacterClassPin);

//Creates a soft class pin of type ActorComponent.
CreatePin(EGPD_Input, UEdGraphSchema_K2::PC_SoftClass, UActorComponent::StaticClass(), NAME_MyActorComponentSoftClassPin);

//Creates a soft object pin of type StaticMesh.
CreatePin(EGPD_Input, UEdGraphSchema_K2::PC_SoftObject, UStaticMesh::StaticClass(), NAME_MyStaticMeshSoftObjectPin);
Let’s add the two last pins to AllocateDefaultPins for the node to be complete. That is IsValid and NotValid ExecPins.
const FName UK2Node_IsValid::NAME_ObjectToCheck(TEXT("Object To Check"));
const FName UK2Node_IsValid::NAME_IsValidExec(TEXT("Is Valid"));
const FName UK2Node_IsValid::NAME_IsNotValidExec(TEXT("Is Not Valid"));

void UK2Node_IsValid::AllocateDefaultPins()
{
	//What we have already added
	CreatePin(EGPD_Input, UEdGraphSchema_K2::PC_Exec, UEdGraphSchema_K2::PN_Execute);
	CreatePin(EGPD_Input, UEdGraphSchema_K2::PC_Object, NAME_ObjectToCheck);
	//End

	//Creates the IsValid output ExecPin
	CreatePin(EGPD_Output, UEdGraphSchema_K2::PC_Exec, NAME_IsValidExec);

	//Creates the NotValid output ExecPin
	CreatePin(EGPD_Output, UEdGraphSchema_K2::PC_Exec, NAME_IsNotValidExec);
}
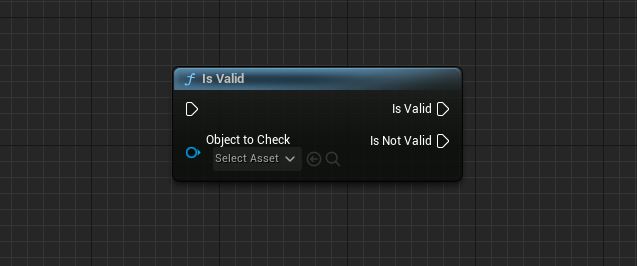
When all this is added, you compile. Your node should look like this:
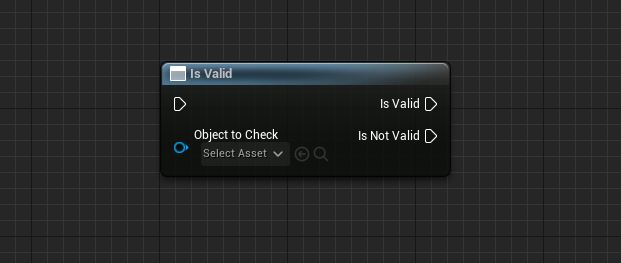
Your node is fully completed visually but can’t do anything, generating Blueprint compiler errors.
Adding the node’s logic
To add logic to our Blueprint node, we need to add the ExpandNode function that runs every time you compile your Blueprint to spawn/remove nodes, generate Blueprint compiler errors, and much more.
//.h
virtual void ExpandNode(class FKismetCompilerContext& CompilerContext, UEdGraph* SourceGraph) override;

//.cpp
void UK2Node_IsValid::ExpandNode(FKismetCompilerContext& CompilerContext, UEdGraph* SourceGraph)
{
	Super::ExpandNode(CompilerContext, SourceGraph);
}
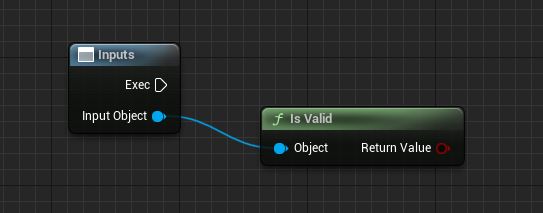
It might be easier to understand this step if we first take a look at how the IsValid node looks like, and then we try to mimic that in code:
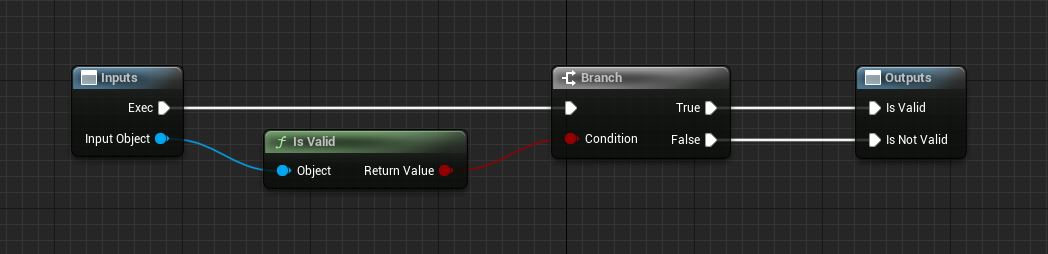
Let’s start with the pure IsValid node:
void UK2Node_IsValid::ExpandNode(FKismetCompilerContext& CompilerContext, UEdGraph* SourceGraph)
{
	Super::ExpandNode(CompilerContext, SourceGraph);

	//I usually cache the Schema. Schema is responsible for node connections, node spawning/deletion in all graphs. UAnimationGraphSchema is the Animation graph's schema, for example.
	const UEdGraphSchema_K2* Schema = CompilerContext.GetSchema();

	//Bool to check if all our actions were successful.
	bool bIsErrorFree = true;

	//SpawnIntermediateNode spawns additional nodes within the node itself, as I mentioned with the SpawnActor node earlier.
	//With this call, we spawn the generic CallFunction node, which is useful when calling any UFUNCTION-specified functions, both static/non-static UFUNCTIONs works.
	UK2Node_CallFunction* const IsValidProxyObjectNode = CompilerContext.SpawnIntermediateNode<UK2Node_CallFunction>(this, SourceGraph);

	//Now let the node know which UFUNCTION we want to call. GET_FUNCTION_NAME_CHECKED is a really good macro to use for this step.
	//First, we have to let the node know the function's name, then give it to the class the UFUNCTION is in.
	IsValidProxyObjectNode->FunctionReference.SetExternalMember(GET_FUNCTION_NAME_CHECKED(UKismetSystemLibrary, IsValid), UKismetSystemLibrary::StaticClass());

	//When we have assigned the UFUNCTION to the node. We let the node create all the pins it needs.
	//UK2Node_CallFunction recongnizes the parameters of the UFUNCTION and creates pins accordingly, so we just have to call AllocateDefaultPins.
	IsValidProxyObjectNode->AllocateDefaultPins();

	//Now all the pins are created. Let's find the Object input pin of the IsValid node, as seen in the picture above.
	UEdGraphPin* IsValidInputPin = IsValidProxyObjectNode->FindPinChecked(TEXT("Object"));

	//Now we have to move the links from the ObjectToCheck pin we created at the beginning of this post to the IsValidInputPin of the IsValid node we just created.
	//This function is pretty tricky to grasp at first. It's only used when you want to move links from a physical pin to a node you spawn inside this function.
	bIsErrorFree &= CompilerContext.MovePinLinksToIntermediate(*FindPin(NAME_ObjectToCheck), *IsValidInputPin).CanSafeConnect();
}
Note: All functions that are being called by a K2_CallFunction node need to be assigned with UFUNCTION(BlueprintCallable)
If we would visualize the code you just wrote, the node’s execution order would look like this:
Now to the rest of the node:
void UK2Node_IsValid::ExpandNode(FKismetCompilerContext& CompilerContext, UEdGraph* SourceGraph)
{
	//What we have already added
	Super::ExpandNode(CompilerContext, SourceGraph);

	const UEdGraphSchema_K2* Schema = CompilerContext.GetSchema();
	bool bIsErrorFree = true;

	UK2Node_CallFunction* const IsValidProxyObjectNode = CompilerContext.SpawnIntermediateNode<UK2Node_CallFunction>(this, SourceGraph);
	IsValidProxyObjectNode->FunctionReference.SetExternalMember(GET_FUNCTION_NAME_CHECKED(UKismetSystemLibrary, IsValid), UKismetSystemLibrary::StaticClass());
	IsValidProxyObjectNode->AllocateDefaultPins();

	UEdGraphPin* IsValidInputPin = IsValidProxyObjectNode->FindPinChecked(TEXT("Object"));
	bIsErrorFree &= CompilerContext.MovePinLinksToIntermediate(*FindPin(NAME_ObjectToCheck), *IsValidInputPin).CanSafeConnect();
	//End

	//Luckily there is already a node for the Branch. We just have to spawn the node like we did earlier.
	UK2Node_IfThenElse* IfThenElseProxyNode = CompilerContext.SpawnIntermediateNode<UK2Node_IfThenElse>(this, SourceGraph);

	//Let the Branch node add its pins.
	IfThenElseProxyNode->AllocateDefaultPins();

	//Now we connect the ReturnValue pin from the spawned IsValid node to the Condition pin on the Branch.
	//MovePinLinksToIntermediate is not used here to link pins. When you connect two spawned nodes with each other, use TryCreateConnection.
	bIsErrorFree &= Schema->TryCreateConnection(IsValidProxyObjectNode->GetReturnValuePin(), IfThenElseProxyNode->GetConditionPin());

	//Now let's move all the pin links from our visual pins on the node to the pins on the spawned Branch node.
	//First, we move the links on the ExecPin to the spawned Branch's ExecPin.
	bIsErrorFree &= CompilerContext.MovePinLinksToIntermediate(*GetExecPin(), *IfThenElseProxyNode->GetExecPin()).CanSafeConnect();

	//Second, we move the links on the IsValidExec pin to the spawned Branch's TrueExecPin.
	bIsErrorFree &= CompilerContext.MovePinLinksToIntermediate(*FindPin(NAME_IsValidExec), *IfThenElseProxyNode->GetThenPin()).CanSafeConnect();

	//Third, we move the links on the IsNotValidExec pin to the spawned Branch's FalseExecPin.
	bIsErrorFree &= CompilerContext.MovePinLinksToIntermediate(*FindPin(NAME_IsNotValidExec), *IfThenElseProxyNode->GetElsePin()).CanSafeConnect();

	//To make sure all actions were successful, we generate an error to the message log if that's not the case.
	if (!bIsErrorFree)
	{
		//This is how you create compiler errors for Blueprint. I'll show more examples later.
		CompilerContext.MessageLog.Error(*LOCTEXT("InternalConnectionError", "IsValidNode: Internal connection error. @@").ToString(), this);
	}

	//No idea why you have to do this step, yet. Will update when I do.
	BreakAllNodeLinks();
}
Our custom K2Node should now be an exact copy of this:
If you compile and try it out in a Blueprint, it should work! Congratulations on your first custom K2Node! :D
Improving the UX
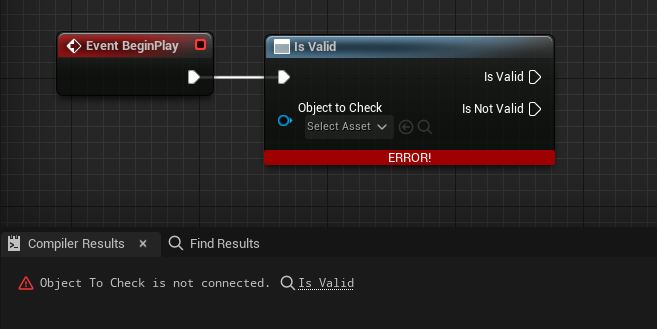
A fun little exercise to make the node fancier than the original one is to generate a compiler error if the object pin is not connected.
To do that, add this to the beginning of the ExpandNode function:
//Find the ObjectToCheck pin and see if it's linked to something
if (FindPin(NAME_ObjectToCheck)->LinkedTo.Num() == 0)
{
	//If not, generate a compiler error.
	//If you want it to just be a warning instead, replace Error with Warning.
	CompilerContext.MessageLog.Error(*LOCTEXT("ObjectToCheck_NotConnected", "Object To Check is not connected. @@").ToString(), this);
}
Now the node should behave like this:
Final touches
Let’s make our node match the style of regular Blueprint nodes.
//Just a function so we can grab the color. You can skip this function.
FLinearColor GetPalletteNodeColor() const
{
	return GetDefault<UGraphEditorSettings>()->FunctionCallNodeTitleColor;;
}

//Get the color of the node. You can assign any color here like FLinearColor::Red.
virtual FLinearColor GetNodeTitleColor() const override
{
	return GetPalletteNodeColor();
};

//Get the icon and the icon tint of the node.
virtual FSlateIcon GetIconAndTint(FLinearColor& OutColor) const override
{
	OutColor = GetPalletteNodeColor();
	return FSlateIcon(FAppStyle::GetAppStyleSetName(), "Kismet.AllClasses.FunctionIcon");
};
If you follow all these steps, the node now looks more like a Blueprint node:
Wrapping up for now
I hope you finished this introduction with the feeling that K2Nodes is not as scary as they seem. Making custom nodes with K2Node is a pretty enjoyable thing to code.
As time passes, I will keep adding stuff to this blog post, so stay tuned.